Understanding DHCP in Cisco Packet Tracer
Let me tell you something weird: I never thought I'd enjoy working with networks. I'm a fullstack dev. I build apps, deploy to AWS, talk about security, scale infra, code with Next.js, and all that jazz. But the idea of "networking stuff" always sounded... boring. Until I met DHCP, and more importantly, Cisco Packet Tracer. Turns out, it’s not just useful — it’s fun as hell. Let me show you how I got a PC to automatically get an IP address from a router (without me hardcoding anything) and why that blew my mind.
What’s DHCP and Why Should You Care?
Imagine walking into a hotel. You don’t choose your room. The front desk gives you one that’s available. That’s DHCP. DHCP (Dynamic Host Configuration Protocol) is like that hotel front desk — it automatically assigns IP addresses, subnet masks, default gateways, and even DNS servers to clients on a network. It means you don’t have to manually configure each PC. It’s a life saver, especially in networks with dozens (or thousands) of devices.
What I Did – Step by Step
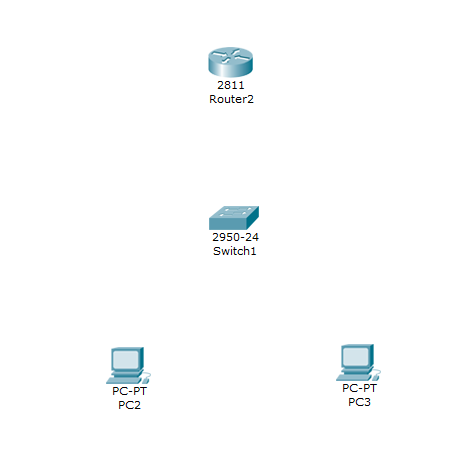
In Cisco Packet Tracer, I built a simple network:
- •1 router
- •1 Switch
- •2 PCs Connected using Ethernet.
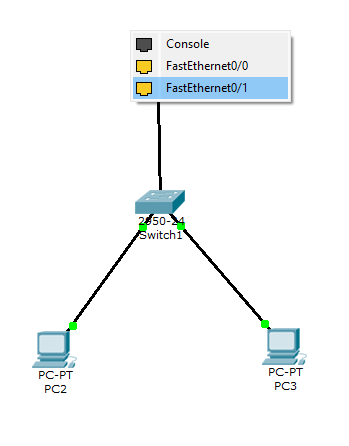
Then I connected the PCs to the switch thought the Ethernet Port.

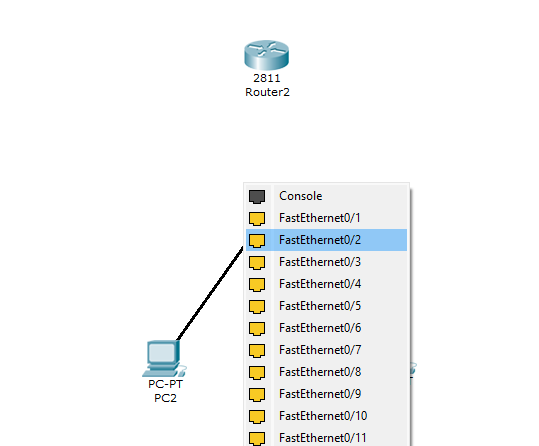
I choosed the "FastEthernet0/2" on the switch, so I can use the "FastEthernet0/1" to connect the switch to the Router. After the connection is done. We do the same in the other terminal (or PC). If everything was do it correctly, we gonna see the connection with green dots and orange (the orange dot means the connection is estabilishing).

Lets connect the switch to the router now. Select the FastEthernet0/1 from the switch.
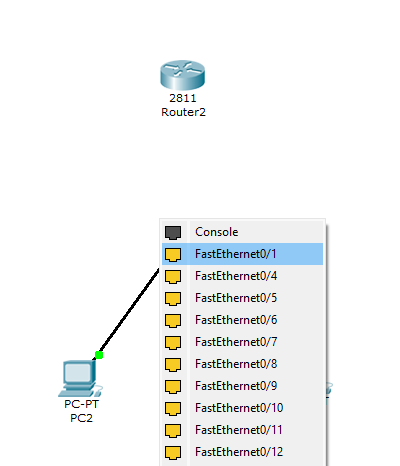
and select the FastEthernet0/1 on the router. (I like to leave the FastEthernet0/0 in case I need to connect another router, I can connect both thought that port).
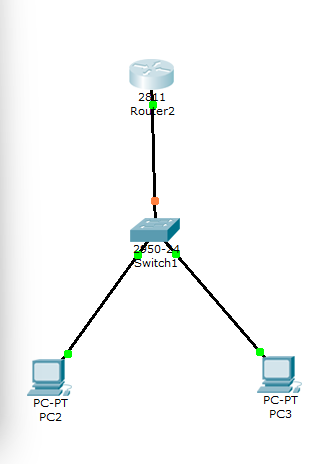
After all the connections thought "Copper Straight-Through", we gonna have something like this:

As you can see, we have the switch connected successfully between the PCs but the switch is not connected to the router (so we are isolated from the external world).
Thats because we need to configure the router. To configure the router in Packet Tracer we click on the icon, then opened the CLI of the router and entered the following:


This gives me access to the router’s configuration mode. From there:
- •
interface fastethernet 0/1: We're configuring the Ethernet port that's connected to the Switch.
- •
ip address 192.168.10.1 255.255.255.0: This sets the IP address of the router’s interface. It’ll act as the default gateway.
- •
no shutdown: Enables the interface. Without this, the port stays "down".
(I leave you the commands below so you can try it in your own machine)
enable
configure terminal
interface fastethernet 0/1
ip address 192.168.10.1 255.255.255.0
no shutdown
If we configure everything correctly, we gonna have communication between our switch and the router.
Even if we currently have a live connection between the switch and the router. Our PCs dont have any private IP, only Mac Address (thats why we only have communication throught the switch). Here is where the DHCP stand out! Instead of setting the private IP for each computer, lets leave that tasks to the router so the router assigned the IP for us. But, before that, we need to configure the DHCP server on the router. Lets go back to the CLI and create a "pool".
ip dhcp pool LAN: Create a pool called "LAN".

What is a DHCP pool?
In simple terms, a DHCP pool is a reserved range of IP addresses that the router (or a DHCP server) can assign automatically to devices that join the network. Think of it like a pool of available addresses. When a device connects, it basically asks:
“Hey, can I get an IP?”
And the router answers:
“Sure, here’s one that’s free: 192.168.10.11”
Why is it called a pool? The term pool comes from the idea of a shared resource — in this case, a collection of IPs that devices can borrow temporarily. Once the lease expires, the IP goes back into the pool unless the device renews it.
after we create the pool called "LAN" (just an identify, you can call it whatever you want), we set the IP range.
- •
network 192.168.10.0 255.255.255.0: Tells the router what network this DHCP pool is for.
- •
default-router 192.168.10.1: Sets the default gateway the clients will use.
- •
dns-server 8.8.8.8: Google’s public DNS server.
After that configuracion. We can go in 2 ways: Excluding a range of IPs for other devices such as printers, cameras, vaccums, diswashers, etc OR we can leave it like this. For the sake of completition of this article, lets exclude a range of IPs from the pool. That means the router cannot lease the IPs we are excluding for new devices (this is something interesting for a future article Im going to write about the DHCP Starvation Attack) for now, lets exclude the IPs from 192.168.10.1 to 192.168.10.10.

And with that, we have our router properly setted up!. Now we check our PCs and lets see the info we got.

As you can see, we dont have an IP Address setted (yet), so lets click on the PC and go to "Config">FastEthernet.
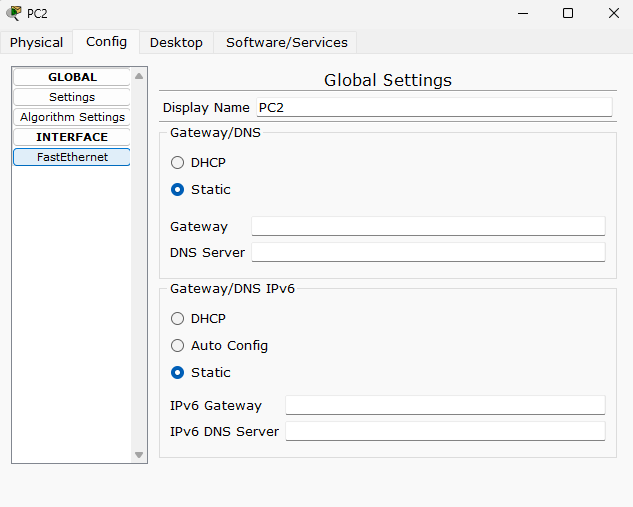
As you can see, in "Gateway/DNS" we dont have anything setted. That's because the "Static" radio button is selected. But... as we already configure our router to become a DHCP server, now we can select the "DHCP" Radio button to get automatically our new IP.

The IP (192.168.10.11) starts at "11" because we exclude in the router, the IP range from 192.168.10.1 to 192.168.10.10. So the router start assign the IP from 11.
And that is how your home internet works and why you have the private IP you have!
Hope you like the article, I tried to be as clear as possible, remember that Im also learning so this is more like a share of my learning rather than a tutorial percé. Have a great week!